Hello, Skyleaders!
Here’s your guide to managing blacklists in Skylead. Use the Global Blacklist to block unwanted leads across your team, while the Individual Blacklist applies to a single account. Add blacklisted items manually or with a CSV file, and filter entries as needed. Choose types and comparisons carefully, especially for emails and domains. For active campaigns, Skylead will notify you to ensure you’re blacklisting correctly. Ready to streamline your lead management? Dive in! 🚀
Team Blacklist
Global Blacklist is the feature that will allow you to blacklist leads for all accounts that belong to the same team.
It contains from:
Let's go!
Blacklist
To access this feature from the login page, click on a team name and then Team blacklist
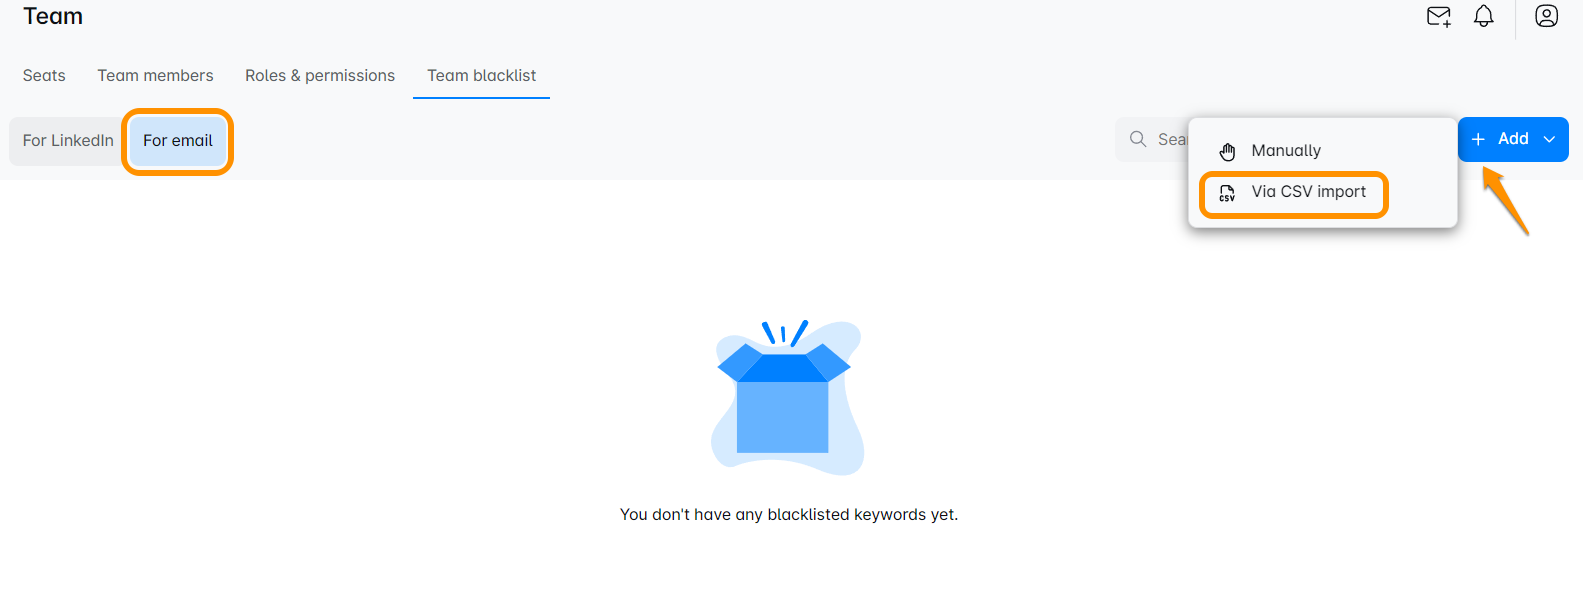
A new page will open and you can select Blacklist for LinkedIn or for email:
From there you can blacklist unwanted leads, companies, emails, and domains using the manual option or by uploading a CSV file.
We will explore how to blacklist leads using a CSV file first.
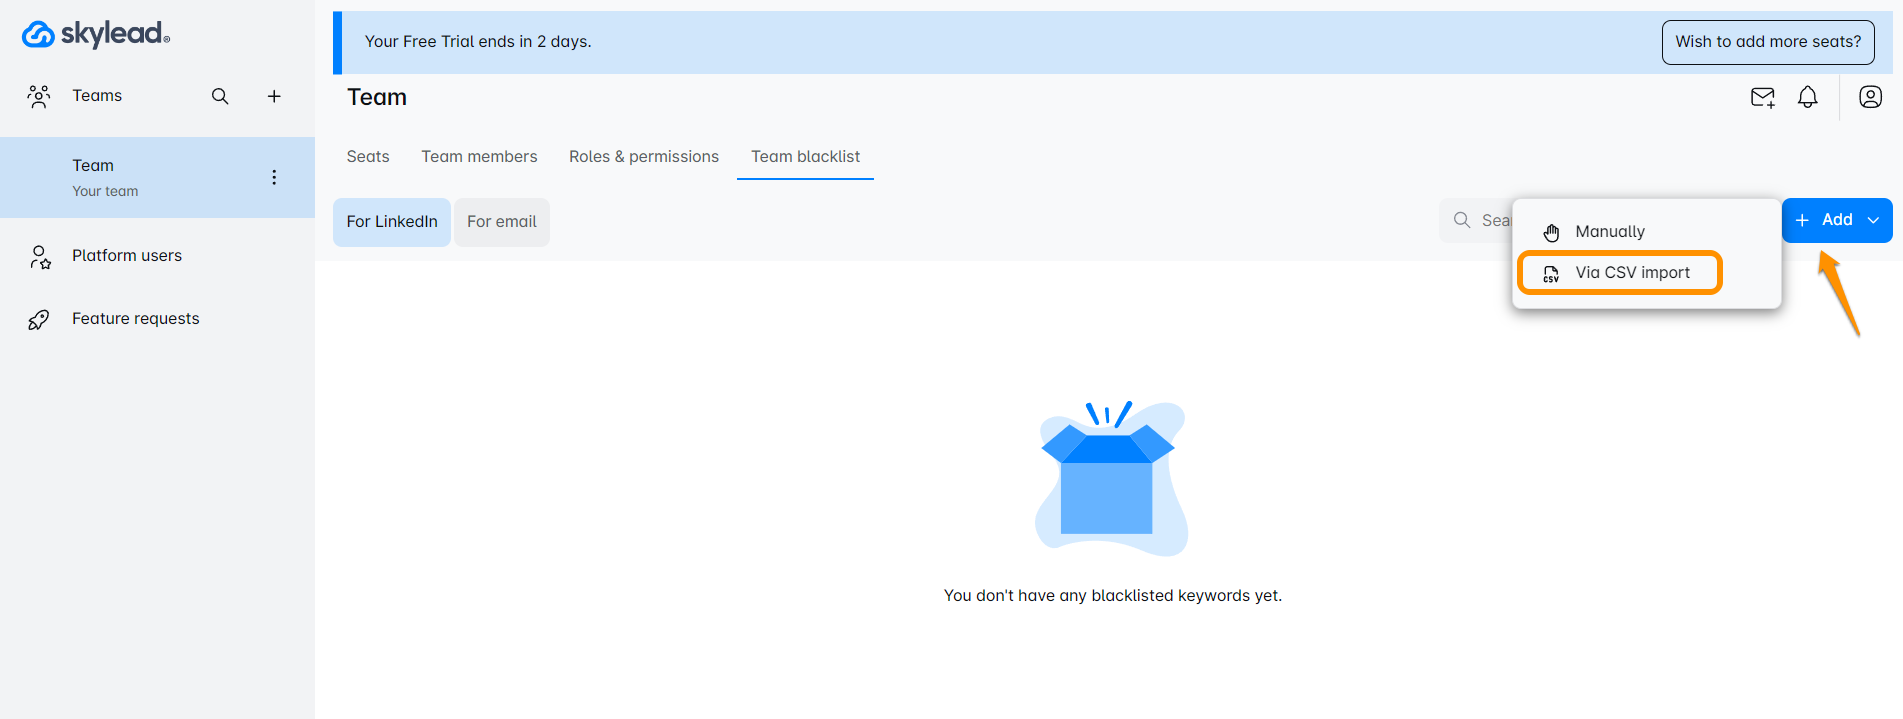
To upload a CSV, click here and select the option Import a CSV file:

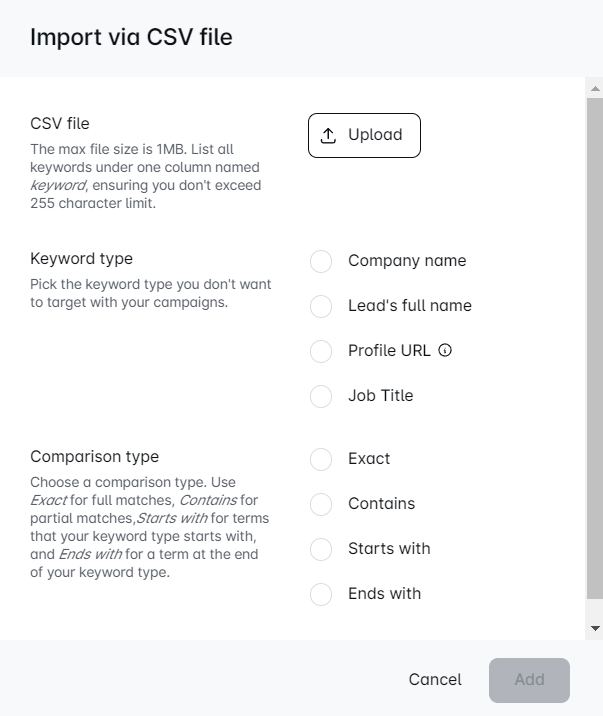
This window will pop up

You can Upload a file or use the drag-and-drop option.
There are 2 mandatory options you need to choose.
The first is the Blacklist type. You can choose from:
- Company name
- Lead's full name
- Profile URL - Insert the LinkedIn profile URL only and we will blacklist it across all three platforms: LinkedIn, Sales Navigator, and Recruiter
- Job title
! Please note that all duplicated blacklisted items will be removed.
This is the information that your CSV file must contain. In this file, you need to have only one column with a 'keyword' written for a title. All values must be in this column.
Depending on the values that you have in the CSV file (Company name, Lead's full name, Profile URL, or JOB title) you will need to select the same accordingly.
! You can't have mixed value types in the CSV file. For example, if you want to blacklist Company names, your CSV file can't have Company names and Profile URLs.
! If you want to blacklist different types, you need to upload those CSVs separately.
You can upload as many CSV files as you want, but they need to contain one value type.
You can only choose one option per CSV file uploaded.
! If you choose ProfileUrl type you will only be able to select Exact comparison.
The second option you need to select is Comparison Type:
- Exact - Add a term that fully matches the selected blacklist type to avoid it. This means that the value from the CSV file will be added to the blacklist exactly as it is written. For example, if the company name you want to avoid has an LLC on their Linkedin, you need to add the LLC to the company name in the CSV file. This also refers to the Profile URLs you upload via CSV file. You can only select the Exact comparison type with this item.
- Contains - Add a term that is contained within the selected blacklist type to avoid it. This means that you can add one word for a company name, a job title, etc. and the tool will avoid everything that has this word in it.
- Start with - Add a term that your blacklist type starts with to avoid it.
- Ends with - Add a term that your blacklist type ends with to avoid it.
You can only choose one option per CSV file uploaded.
When you upload your CSV files, they will show up like this:
You will be able to see how the item was imported, what type you selected, and also the Matching criteria.
There is a bin button that will allow you to delete anything you don't need in your blacklist anymore.
To blacklist leads manually all you need to do is go here:
A new window will pop up:
Here you need to manually type in or copy/paste whatever type you want to blacklist.
! Please note that for every added value you need to click on the enter taster on your keyboard so the value is saved.
! Please note that when selecting the Profile URL item, you can only choose the Exact comparison type.
! Please note that all duplicated blacklisted items will be removed.
Once you populate your blacklist, choose Blacklist type and Comparison type.
Once you are done, just click Add to Blacklist.
You might get this warning message:
This will pop up if you have active campaigns and Skylead will also blacklist the leads that are in these campaigns. So we are just warning you to make sure that you don't make a mistake.
Hit Add to Blacklist if you are sure that you blacklisted the right items and that's all.
To see the difference between the ways you used to add leads to the blacklist, check out Adding method column:
Emails and Company Domains Blacklist
This feature is used to avoid emails or company domains you don't want in your campaigns.
Options to insert items you want to blacklist are the same as for the regular Blacklist, with slight modifications to the CSV file.
You can use Upload CSV file or choose to blacklist items manually by writing them down (use Enter to separate values) or just copy/paste them into the designated box.
To start blacklisting emails and domains using CSV files, click here:

! Note that you can upload multiple CSV files with each file containing a different item type for blacklisting. Just make sure to choose the type accordingly.
A window will pop up. Notice how some of the Blacklist types are different. Comparison options remain the same.
For the backlist type, you have two options, email address or company domain. The format of a company domain is domain.com and the email address is email@domain.com
! Please note that all duplicated blacklist items will be removed.
Comparison types you can choose from are:
- Exact - Add a term that fully matches the selected blacklist type to avoid it. This means that the value from the CSV file will be added to the blacklist exactly as it is written. For example, if the company name you want to avoid has an LLC on their Linkedin, you need to add the LLC to the company name in the CSV file.
- Contains - Add a term that is contained within the selected blacklist type to avoid it. This means that you can add one word for a company name, a job title, etc. and the tool will avoid everything that has this word in it.
- Starts with - Add a term that your blacklist type starts with to avoid it.
- Ends with - Add a term that your blacklist type starts with to avoid it.
Use these instructions to format the CSV file for blacklisting:
For emails:
or
For the domains:
This is the information that your CSV file must contain. In this file, you need to have only one column with a 'keyword' written in the title. All values must be in this column.
Depending on the values that you have in the CSV file (email address or company domain) you need to select the same accordingly.
Once you have selected both type and comparison, click on Add to Blacklist to continue.
! Please note that the maximum for each file is 1 MB and 255 for characters in each cell.
You might get this warning message:
This will pop up if you have active campaigns and Skylead will also blacklist the leads that are in these campaigns. So we are just warning you to make sure that you don't make a mistake.
Hit Add to Blacklist if you are sure that you blacklisted the right items and that's all.
! Leads who unsubscribe from your emails will be automatically blacklisted and shown here.
There is one more exciting option that you can do with your blacklist! If you have too much time on your blacklist and you only want to see some based on specific criteria, we have very good news for you! You can filter your list!
To filter your blacklist click here:
A new window will appear:
You can choose your filter here. You can filter by blacklist type, by comparison, or by the method you used to import your items. You can have multiple criteria or choose only one. You can also filter by the input type you use.
Once you are satisfied with your selection click on the Apply button to see selected items.
This filter is slightly different for Email and Domain Blacklist and it looks like this:
Here you also have the option for multiple choice :)
Individual Blacklist
This feature is used when you want to blacklist items only on one account, it won't impact another account from the team.
To access Individual Blacklist go to :
Here you are also able to upload a CSV or add items manually.
For instructions on how to upload a CSV file to Blacklist, refer to this section of this article.
When adding leads, manually make sure you click on Enter so the tool can save the value you typed in.
💡The principles for both Global and Individual blacklists are the same, the only difference is that Global Blacklist allows you to blacklist leads across all accounts under one team, and Individual Blacklist is used to avoid leads on a specific account.
Emails and Company Domains Blacklist
For this type of blacklisting, you can also use a CSV file or a manual approach.
Using a manual approach can come in handy when there are only a couple of emails or company domains you want to blacklist.
To do this, click here:
This window will pop up:
Type the email or company domain here, use Enter to separate the values, and choose the corresponding type (Lead's email or Company domain, depending on what you have written down) Choose your comparison type and click Add to Blacklist.
Everything that you blacklisted will be shown in this table here:
You can update your blacklist manually or through a CSV file. You can also remove items by clicking on the bin icon.
We hope this article was helpful!
Enjoy your Skylead experience!
Comments
0 comments
Please sign in to leave a comment.